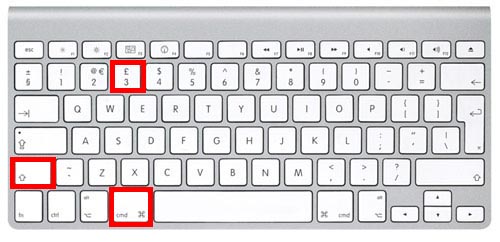
how to screenshot on mac

Capture Your Entire Screen 🖥️
This is the quickest way to grab a picture of everything visible on your display.
- Press and hold these three keys together:
Shift + Command + 3. - That’s it! The screenshot will automatically save to your desktop as a
.pngfile.
Capture a Selected Portion of Your Screen 🖼️
Use this method when you only need to capture a specific part of your screen.
- Press and hold these three keys together:
Shift + Command + 4. - Your mouse pointer will change into a crosshair icon (+).
- Click and drag the crosshair to draw a box around the area you want to capture.
- Let go of the mouse button. The selected area will be saved as a screenshot on your desktop.
Pro-Tip: After pressing Shift + Command + 4, if you need to adjust your selection, press and hold the Spacebar while still holding down the mouse button to move the entire selection box.
Capture a Specific Window or Menu 🪟
This is the best way to get a clean screenshot of a single app window or a menu without any background clutter.
- Press and hold these three keys together:
Shift + Command + 4. - Your pointer will become a crosshair. Now, press the
Spacebar. - The crosshair will turn into a camera icon 📷.
- Move the camera icon over the window or menu you want to capture. It will become highlighted in blue.
- Click your mouse or trackpad. A perfect screenshot of just that window (with a nice shadow effect) will be saved to your desktop.
Use the Screenshot Toolbar for More Options 🛠️
For more control, including screen recording, use the built-in Screenshot app.
- Press and hold these three keys together:
Shift + Command + 5. - A small control bar will appear at the bottom of your screen.
From this toolbar, you can:
- Capture the entire screen, a specific window, or a selected portion (the first three icons).
- Record a video of your entire screen or a selected portion (the next two icons).
- Click “Options” to change where your screenshots are saved (e.g., to Documents instead of Desktop), set a timer, or show the mouse pointer.


